Sensory bottles can be used in so many different ways! One of my favorite ways to use sensory bottles in my preschool classroom is for discovery (like our 5 Little Pumpkins bottle) which leads to learning. Making this rainbow alphabet sensory bottle took no time, and can be used in to fit the needs of your child or classroom.
Check out my tips below which made it easier for my 3 year-olds to play with this sensory bottle!

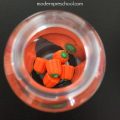
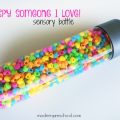
Rainbow Alphabet Sensory Bottle
Many times sensory bottles can be created using clear, plastic water bottles from your recycling bin! I prefer to use water bottles that have a wide top. This makes adding manipulatives that I’m using to fill the sensory bottle easier to add to the bottle.
For our rainbow alphabet bottle, I used a VOSS plastic 16.9 ounce water bottle. Be careful to use the plastic version for younger children. Dropping sensory bottles in my classroom happens a lot, so I would be nervous to add glass to the mix!
Remove the labels from the VOSS water bottle. If there is any sticky areas left, use a cotton ball and rubbing alcohol to quickly remove the residue.

My preschoolers are obsessed with anything we can use on our light table (which is more of a light panel that can be used on the table top or floor!), so we have had our see-through jeweled letters out recently. This set was purchased through Constructive Playthings, but similar letter products can be found on amazon too.
To make it easier for my preschoolers to see and recognize each individual letter of the alphabet, I sorted out only one set of rainbow mixed letters to add to the bottle. Our bottle includes the 26 upper case letters of the alphabet.
When sorting the letters, I was very careful not to use the same colors for certain letters. For example, I made sure that the M and W were different colors. I also make sure that the N and Z were different. This will make it easier for the younger learners to be able to find each of the 26 letters.

Add the letters to the empty bottle.
Fill the bottle with water, but not all the way! I filled the water up to where the bottom of the cap sits. This left enough extra room in the bottle for the letters to move around in the water easily.
When it was too full, the letters clumped together. The nice thing about using water in the sensory bottle is that the amount can easily be adjusted!
Using water in our rainbow alphabet sensory bottle makes the activity super easy to put together!
But what if the letters are moving too fast for your child, and he ends up getting frustrated when looking for certain letters? Easy! Use clear liquid dish soap instead of water. Add clear liquid hand soap if the letters are still moving too quickly.

Now it’s Time to Play!
Simply move the sensory bottle in different directions to see the alphabet letters move through the water!
Watch the colored letters pass by each other. Name the letters. Identify the colors. Count to see how many green letters, purple letters, red letters, etc. that there are. Find all the letters in your name. Sing the ABC song while moving the letters all around. Talk about the direction the letters are moving. Enjoy the calming way that the letters float up and down.
To add another learning element to our rainbow alphabet sensory bottle, I created a free printable letter game!<
Simply print it below and have your child color in or use a Do-A-Dot marker to stamp the letter as she sees it in the bottle. After using the alphabet bottle in circle time, I’ll add it to a learning center area for my preschoolers to work together to find and dot the letters!
Download the printable alphabet page from the pink button below.

You must check out these other rainbow-themed sensory bottles too!

This so cool. I am definitely going to make this. I don't think your links are working for the letter gems and the light table because when I clicked on it it took me to a link about dot markers. Thanks
I hope your little one enjoys the sensory bottle! And I updated the links, so they should work correctly now. Thanks for letting me know!